2014 Earth Day Wind Turbine Blade Design Challenge
Step-by-step instructions for designing and building your blades:
Step 1: Draw several shapes for your blades, then choose which one you like best. Decide the number of blades you will make. You may make as few as one or as many as six. Important: The maximum length and width for your blades is 20 centimeters. There is no minimum length or width.
Step 2: Choose a material for your blades. This can be balsa wood (Joann at Town and Country has balsa sheets of various thicknesses and widths. Look for coupons in its Sunday advertisement.), corrugated cardboard or plastic, poster board, foam core board, polystyrene foam from food packaging, etc..
Step 3: Cut out the blade shape you chose in step 1 to use as a pattern. Trace this shape onto your blade material. Cut out your blades. Smooth the cut edges with sandpaper (a nail file works well).
Step 4: Decide where you want to attach the dowels. Attach the dowels with glue (wood, hot, super, “Glue-All”, “Gorilla”, “Titebond”, etc.) Be sure to test your glue on a scrap of any plastic material first. Use clamps or a heavy book to hold the dowels firmly while the glue sets. You may use tape in addition to glue if you desire. Important: At least one half of the length of the dowel must be attached to the blade.
Step 5: (Optional) Paint your blades with a glossy paint or varnish, or wax them to reduce surface drag. Be sure to test your coating on a scrap of any plastic material first.
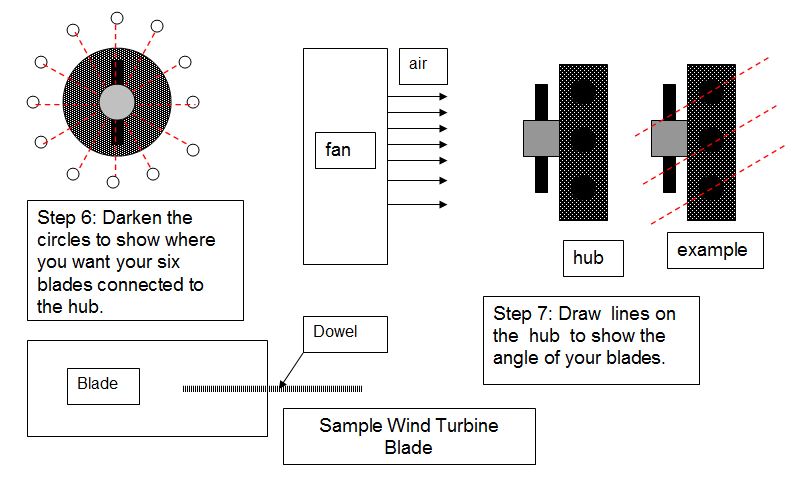
Step 6: Decide where you will insert your blades into the hub. Darken the appropriate circles in the drawing of the face view of the hub below. Blades do not have to be evenly spaced.
Step 7 : Decide the pitch, the angle the flat surface of your blade makes with respect to the wind direction. Indicate the pitch by drawing a line through the top view of the hub below.
Step 8: Bring this sheet (with your name(s) on it!), your finished blades, and any unused dowels into a bag. Bring them to the Earth Day Fair on April 23. We’ll test all of the blades at the fair.
Step-by-step instructions for designing and building your blades:
Step 1: Draw several shapes for your blades, then choose which one you like best. Decide the number of blades you will make. You may make as few as one or as many as six. Important: The maximum length and width for your blades is 20 centimeters. There is no minimum length or width.
Step 2: Choose a material for your blades. This can be balsa wood (Joann at Town and Country has balsa sheets of various thicknesses and widths. Look for coupons in its Sunday advertisement.), corrugated cardboard or plastic, poster board, foam core board, polystyrene foam from food packaging, etc..
Step 3: Cut out the blade shape you chose in step 1 to use as a pattern. Trace this shape onto your blade material. Cut out your blades. Smooth the cut edges with sandpaper (a nail file works well).
Step 4: Decide where you want to attach the dowels. Attach the dowels with glue (wood, hot, super, “Glue-All”, “Gorilla”, “Titebond”, etc.) Be sure to test your glue on a scrap of any plastic material first. Use clamps or a heavy book to hold the dowels firmly while the glue sets. You may use tape in addition to glue if you desire. Important: At least one half of the length of the dowel must be attached to the blade.
Step 5: (Optional) Paint your blades with a glossy paint or varnish, or wax them to reduce surface drag. Be sure to test your coating on a scrap of any plastic material first.
Step 6: Decide where you will insert your blades into the hub. Darken the appropriate circles in the drawing of the face view of the hub below. Blades do not have to be evenly spaced.
Step 7 : Decide the pitch, the angle the flat surface of your blade makes with respect to the wind direction. Indicate the pitch by drawing a line through the top view of the hub below.
Step 8: Bring this sheet (with your name(s) on it!), your finished blades, and any unused dowels into a bag. Bring them to the Earth Day Fair on April 23. We’ll test all of the blades at the fair.